1 - Project Set up
First, you need a Terminal3 account. Register here.
This integration requires your Terminal3 project credentials:
- Project Key: Your public project identifier
- Secret Key: Your private project key
Your payment methods are configured through your Terminal3 Dashboard. Ensure you have enabled the payment methods you want to support:
- Brick: Credit and debit cards
- PayAlto: Local payment methods based on user location
2 - Core SDK Integration Instruction
Step 1: Add Core SDK to the project
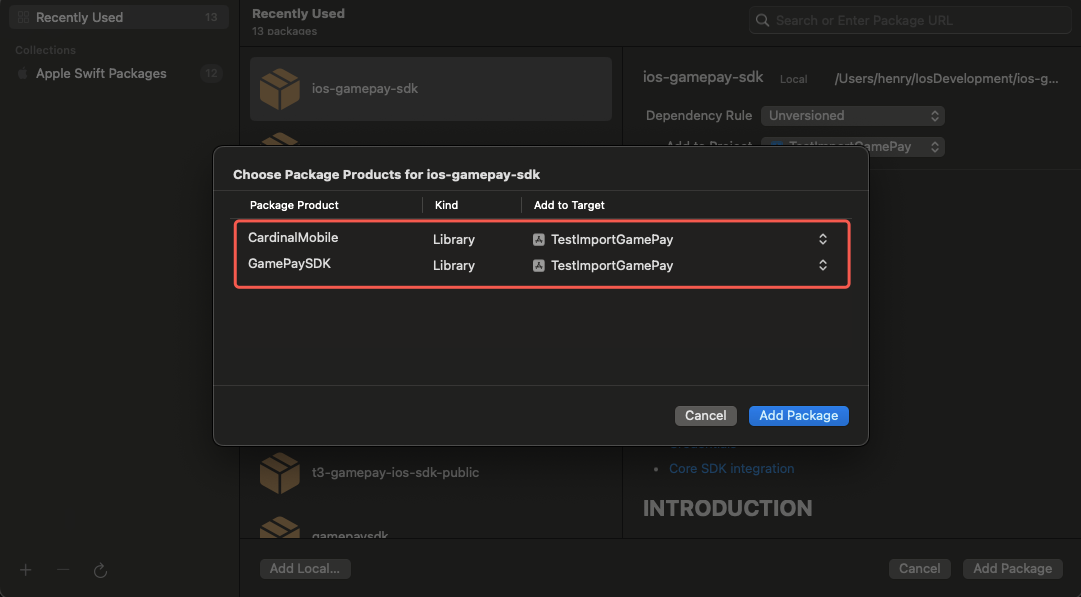
Install with Swift Package Manager
- Location: https://github.com/paymentwall/ios-gamepay-sdk
- Ensure to add both
GamePaySDK&CardinalMobileproducts to your Target
Install as a manual framework
- Download the
xcframeworkfiles from GitHub and move them to the project folder - Open Project settings → choose
Generaltab → chooseTarget→ Dragxcframeworkfiles intoFrameworks and Librariessection → chooseEmbed & sign

- Ensure to add both
GamePaySDK&CardinalMobileframeworks
NOTE:
The GamePaySDK requires the CardinalMobile framework for handling 3D Secure 2.0 during card processing. Add the CardinalMobile framework to your target; otherwise, the build will fail.
3D Secure 2.0 (3DS2), defined by EMVCo, is the successor to 3DS1. It supports mobile and in-app payments, improves the authentication flow, and leverages additional data for stronger fraud prevention and reduced checkout drop-offs.
Step 2: Create a configuration
The payment options displayed to users are determined by the payment methods and configurations enabled in your Merchant Area. Ensure these are set up in the Merchant Area before running tests.
Basically, the SDK supports two types of payment systems:
- Brick
- PayAlto
Init the PaymentSheet.Configuration instance
let configuration = PaymentSheet.Configuration()
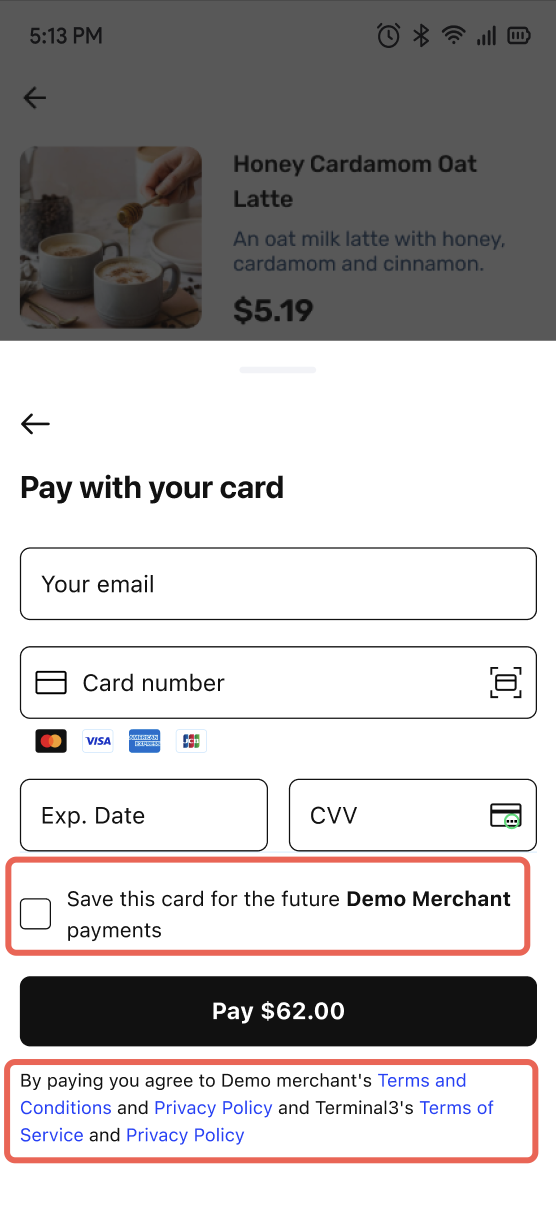
You need to establish your display name, terms of service URL, and privacy policy URL, ensuring that users can access them.
configuration.merchantDisplayName = "Demo Merchant"
configuration.merchantTermsOfServiceURL = "https://example.com/terms-of-service"
configuration.merchantPrivacyPolicyURL = "https://example.com/privacy-policy"
For certain payment methods, users must complete authorization in an external browser/app. To redirect them back to your app afterward, configure the clientURL with your app’s deeplink. Check the guidance to configure a deeplink
configuration.clientUrl = "gp-demo://gamepay-redirect"
Be sure to include your keys in the configuration so that the SDK can do authorization on your behalf
configuration.setKeys(
	projectKey: "your-project-key",
	secretKey: "your-secret-key"
)
Step 3: Create a new payment
let payment = PaymentObject(
    itemID: "7f433654-9d34-41ef-b94f-8da635f510eb",
    userID: "7ed7105b-6bf0-49c6-871f-b66d11690126",
    name: "Test Payment",
    price: 10,
    currency: "USD",
    countryCode: "US",
    email: "user@example.com",
    customParams: [:]
)
You can add custom pingback parameters via customParams. Check the documentation for details
Step 4: Present PaymentSheet
Init and present a PaymentSheet
class ViewController: UIViewController {
	 var paymentSheet: PaymentSheet?

	 func checkout() {
				// Setup payment methods
        let configuration = PaymentSheet.Configuration()
				configuration.merchantDisplayName = "Demo Merchant"
				configuration.merchantTermsOfServiceURL = "https://example.com/terms-of-service"
				configuration.merchantPrivacyPolicyURL = "https://example.com/privacy-policy"
        let payment = PaymentObject(
				    itemID: "7f433654-9d34-41ef-b94f-8da635f510eb",
				    userID: "7ed7105b-6bf0-49c6-871f-b66d11690126",
				    name: "Test Payment",
				    price: 10,
				    currency: "USD",
				    countryCode: "US",
				    email: "user@example.com",
				    customParams: [:]
				)
        paymentSheet = PaymentSheet(payment: payment, configuration: configuration)
        paymentSheet?.present(from: self, delegate: self)
	 }
}
Step 5: Handle Payment Result
Implement PaymentSheetDelegate protocol to handle payment results:
extension ViewController: PaymentSheetDelegate {
    func handlePaymentResult(_ result: PaymentSheetResult) {
        let status: String
        switch result.status {
        case .completed:
            status = "SUCCESS"
				case .pending:
            status = "PENDING"
        case .canceled:
            status = "CANCELED"
        case .failed:
            var errorMesssage: String
            if let error = result.error,
               let gpError = error as? GPAPIClientError {
                errorMesssage = gpError.error
            } else {
                errorMesssage = result.error?.localizedDescription ?? ""
            }
            status = "ERROR: \(errorMesssage)"
        @unknown default:
            status = "UNKNOWN"
        }

        showAlert(title: "Payment Result",
                  message: status,
                  actionTitle: "Got it",
                  completeHandler: nil)
    }

    func handleChargeRequest(_ parameters: ChargeRequestParameters) {
	    // Submit a request to your server to handle `Brick Charge Request`
    }
}
3 - Payment Methods Integration Details
3.1 - Brick
Step 1: Obtain a one-time token derived from the card details.
When a user selects card payment, they can use a previously saved card for quick checkout if they’ve given consent to store cards. If not, they must manually enter their card details. The SDK will then tokenize this information to comply with global security standards for card processing.
Step 2: Create A Charge
The SDK automatically retrieves the one-time token and returns it to your application. You can then use it in your backend to initiate a charge request to our server.
Client Side: Implement handleChargeRequest **from PaymentSheetDelegate
func handleChargeRequest(_ parameters: GamePaySDK.ChargeRequestParameters) {}
Server Side:
<?php

Paymentwall_Config::getInstance()->set(array(
    'private_key' => 'YOUR_PRIVATE_KEY'
));

$parameters = $_POST;
$chargeInfo = array(
    'email' => $parameters['email'],
    'history[registration_date]' => '1489655092',
    'amount' => 9.99,
    'currency' => 'USD',
    'token' => $parameters['brick_token'],
    'fingerprint' => $parameters['brick_fingerprint'],
    'description' => 'Order #123',
    'secure' => '1',
		'secure_return_method' => "url",
		'secure_redirect_url' => $redirectUrl
);

$charge = new Paymentwall_Charge();
$charge->create($chargeInfo);
Parameters and descriptions can be found here.
Step 3: Handle Charge Response
If the charge request is successful, pass the data to the completionHandler so the SDK can process it
func handleChargeRequest(_ parameters: GamePaySDK.ChargeRequestParameters) {
    var req = URLRequest(url: URL(string: "https://your-server-domain/charge")!)
    var bodyDict: [String: Any?] = [
        "token": parameters.cardToken,
        "email": parameters.cardData["email"],
        "firstname": parameters.cardData["firstname"],
        "lastname": parameters.cardData["lastname"],
        "amount": parameters.payment.price,
        "currency": parameters.payment.currency,
    ]
    if let refID = parameters.refID {
        bodyDict["reference_id"] = refID
    }
    if let secureToken = parameters.secureToken {
        bodyDict["brick_secure_token"] = secureToken
    }
    if let chargeID = parameters.chargeId {
        bodyDict["brick_charge_id"] = chargeID
    }
    if let data = try? JSONSerialization.data(withJSONObject: bodyDict, options: []) {
        req.httpBody = data
    }
    req.httpMethod = "POST"
    req.setValue("application/json", forHTTPHeaderField: "Content-Type")
    URLSession.shared.dataTask(with: req, completionHandler: { (data, response, error) in
        DispatchQueue.main.async {
            if let data = data {
                completionHandler(data)
            }
        }
    }).resume()
}
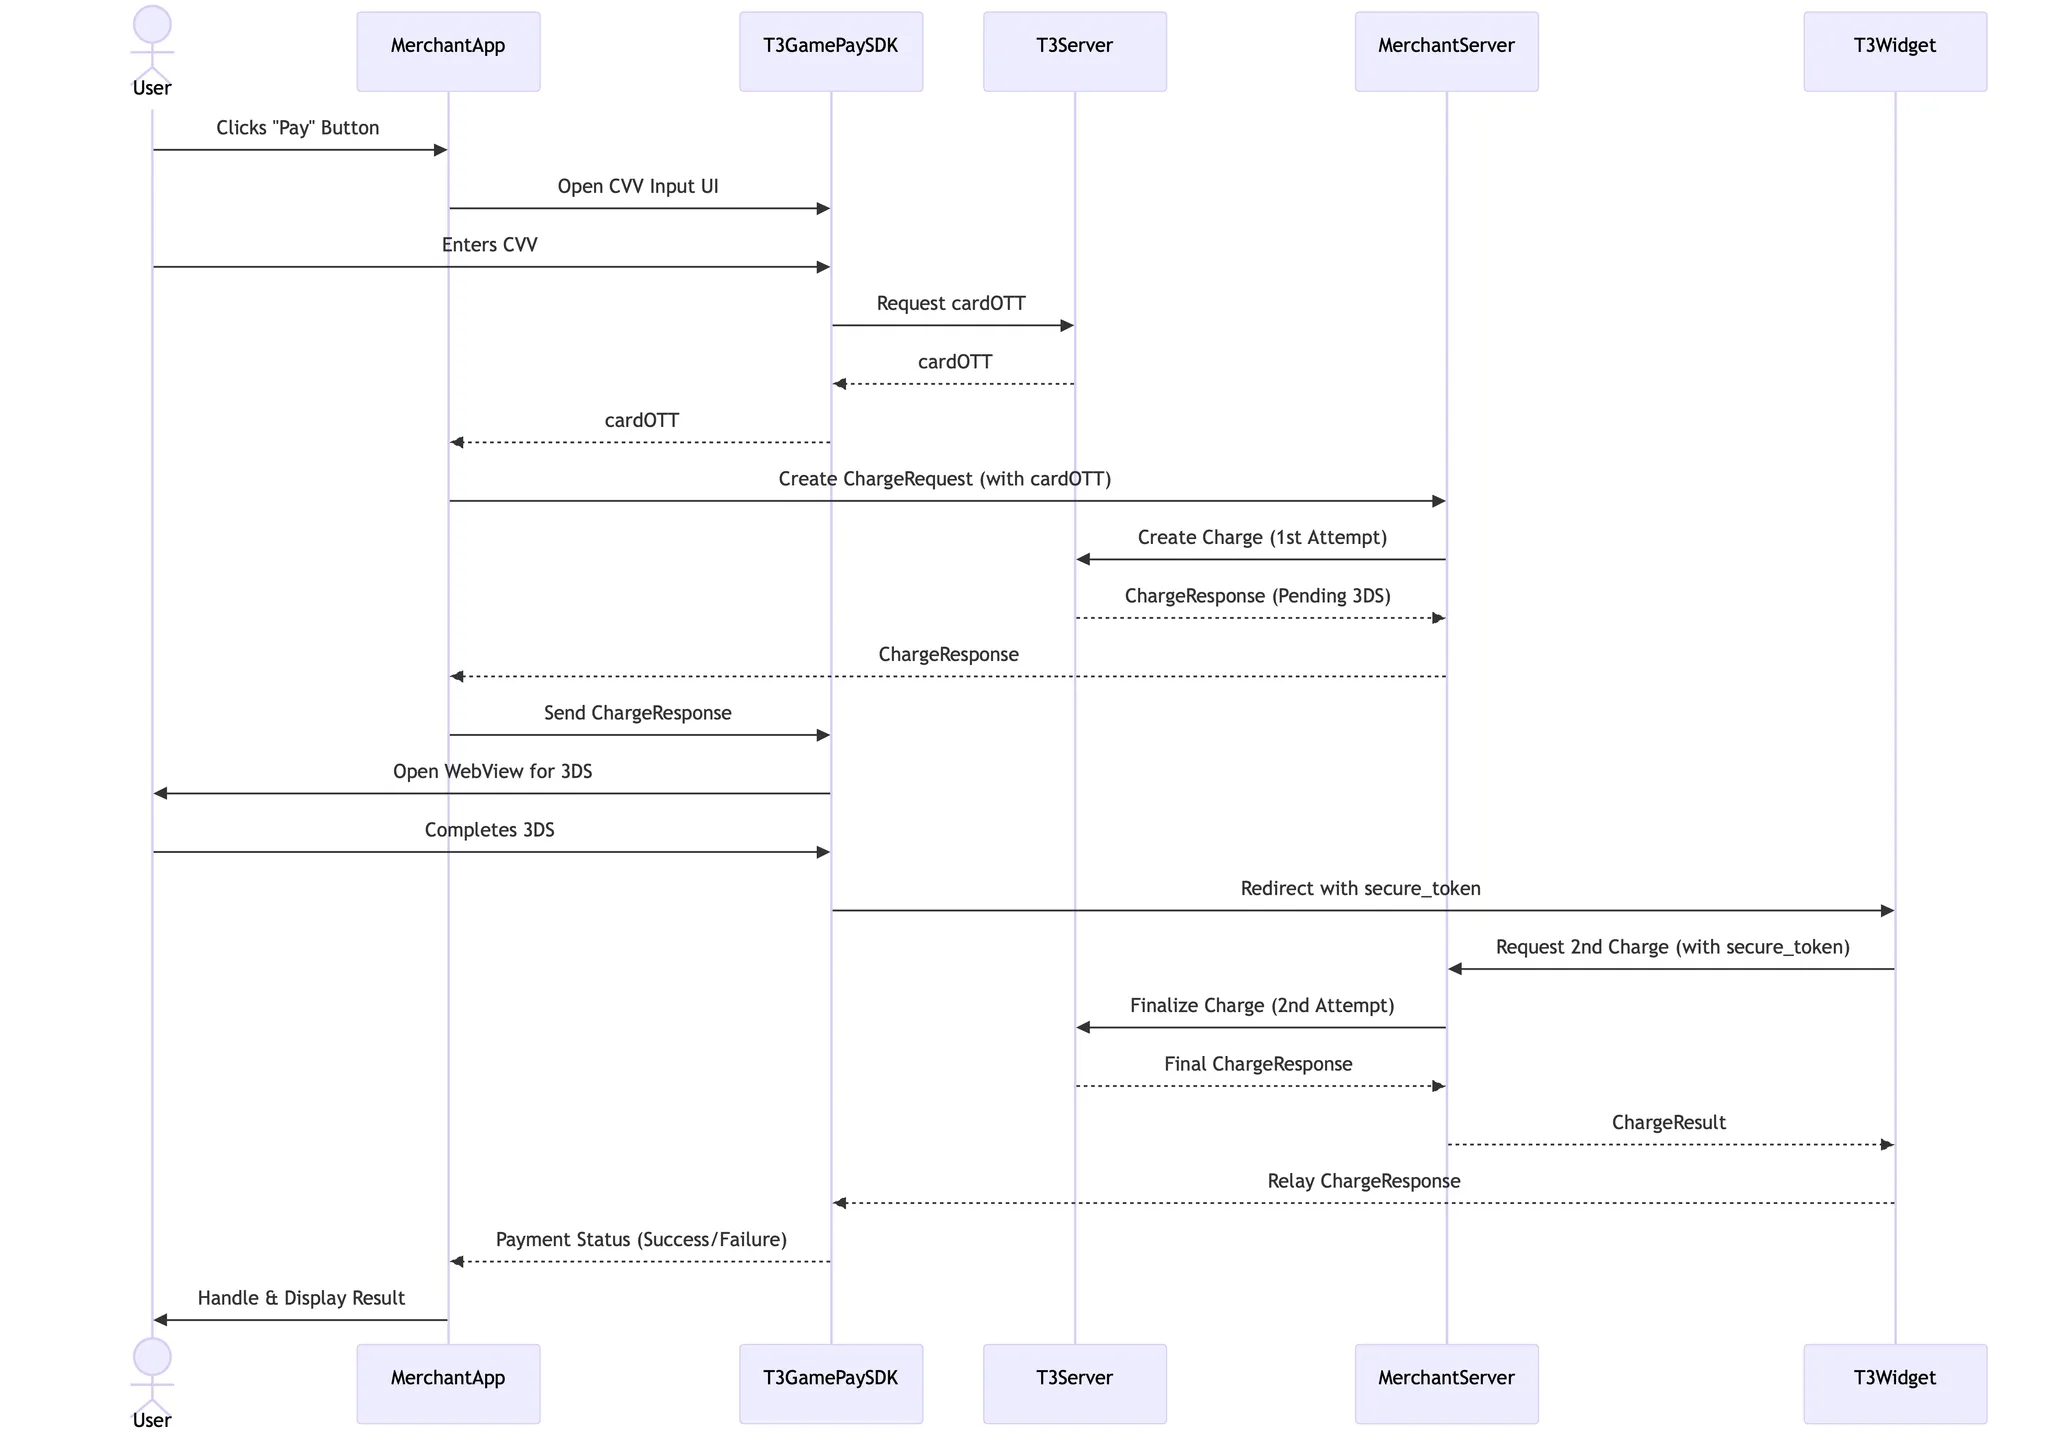
Now, there are three scenarios:
Scenario 1: Frictionless Transaction
In this flow, the user is not required to complete a 3DS challenge. The transaction is approved instantly, and the SDK returns the payment result directly to the application.
Scenario 2: 3DS2 Challenge Flow
In this flow, the user must complete a 3DS2 challenge, which is rendered natively within the application. Once the challenge is completed, the SDK provides a secureToken and prompts the application to initiate the second charge request using delegate.handleChargeRequest. At this stage, ensure that the secureToken is included in the payload of the server-side request.
Scenario 3: Webview Challenge Flow
In this flow, the 3DS challenge is managed via a webview. After the user completes the challenge, the SDK automatically submits the second charge request to your server through the secure_redirect_url that was provided in the payload of the initial charge request. From this request’s payload, you can obtain both the brick_secure_token and the brick_charge_id, which can be used to proceed with subsequent steps in the transaction lifecycle.
<?php
$chargeInfo = array(
    ... // your original charge request parameters
);

if (isset($parameters['brick_charge_id']) AND isset($parameters['brick_secure_token'])) {
    $chargeInfo['charge_id'] = $parameters['brick_charge_id'];
    $chargeInfo['secure_token'] = $parameters['brick_secure_token'];
}
?>
Step 4: Handle payment result
Once the second charge is completed successfully, the SDK will send the payment result back to your application. You can reference the charge object using result.charge
3.2 - PayAlto
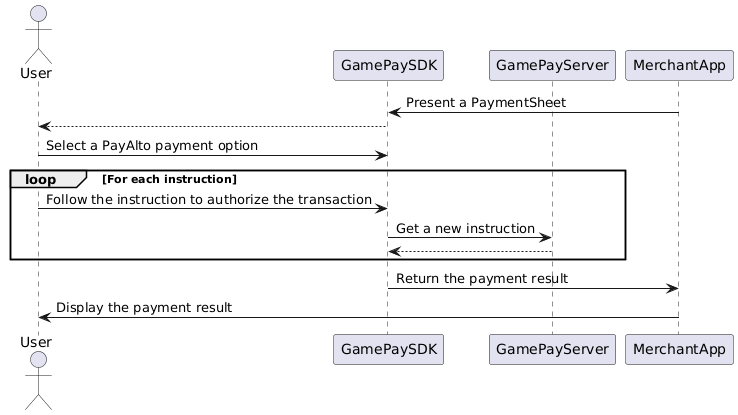
Step 1: The user selects a PayAlto payment method
Based on the payment systems enabled by the merchant in the Merchant Area, the SDK displays a list of available payment methods. Each method includes specific instructions that the user must follow to proceed.
Step 2: The user completes the required instructions
The user is prompted to provide payment information according to the method’s requirements. This may involve entering details directly within the application or being redirected to an external browser or app for authorization.
To ensure the user is redirected back to the application after completing authorization in an external flow, set configuration.clientURL with your app’s deeplink or universal link.
Step 3: Process the payment result
After the user completes the required steps, the SDK returns the payment result to the application.
4 - Link out payment
In certain countries, it’s possible to link to an external website to process payments on iOS. For instance, this guide explains how to sell in-app credits by using GamePay Checkout, which directs users to a GamePay-hosted payment page to complete their purchase.
4.1 - Create a LinkOutPaymentHandler
LinkOutPaymentHandler is an object that manages redirection to the Terminal3 payment widget through an external browser. Configure it with the following:
- userId: The customer ID
- clientUrl: A deeplink that brings the user back to your app after payment.
- externalID: ID of your product. Order reference ID could also be set here. We will communicate back to you via the pingback as goodsid parameter. The maximum length is 256.
- widget: the widget code
- countryCode (Optional): The length must be 2-character according to ISO 3166-1 alpha-2 code of the country. Required to be in uppercase. It overrides the location detected by IP.
For more details, refer to https://docs.paymentwall.com/apis#section-checkout-onetime
Make sure your app is set up to handle the return URL properly, using universal links or a registered URL scheme. Check the guidance to configure a deeplink
let userID = UUID().uuidString
let externalID = UUID().uuidString
let setting = LinkOutPaymentHandler.WidgetSetting(projectKey: "your-project-key",
                                                  secretKey: "your-project-secret-key",
                                                  userId: userID,
                                                  clientUrl: "https://example.com/linkout-redirect",
                                                  amount: 5,
                                                  currencyCode: "USD",
                                                  externalID: externalID,
                                                  widget: "pw25",
                                                  countryCode: "US")
self.linkOutPaymentHandler = .init(with: setting, delegate: self)
4.2 - Start a checkout
Opens the checkout URL in Safari
self.linkOutPaymentHandler?.start(from: self)
4.3 - Start polling to check the payment status
After redirecting the user to the external flow, the SDK will do the polling to periodically get the payment status
4.4 - Show payment results to your user
Implement the PaymentDelegate protocol to handle payment results once the transaction is complete
extension LinkoutPaymentExampleViewController: PaymentDelegate {
    func handlePaymentResult(_ result: PaymentResult) {
        let status: String
        switch result.status {
        case .completed:
            status = "SUCCESS"
        case .pending:
            status = "PENDING"
        case .canceled:
            status = "CANCELED"
        case .failed:
            var errorMesssage: String
            if let error = result.error,
               let gpError = error as? GPAPIClientError {
                errorMesssage = gpError.error
            } else {
                errorMesssage = result.error?.localizedDescription ?? ""
            }
            status = "ERROR: \(errorMesssage)"
        @unknown default:
            status = "UNKNOWN"
        }

        showAlert(title: "Payment Result",
                  message: status,
                  actionTitle: "Got it",
                  completeHandler: nil)
    }
}
5 - Add Custom Parameters to the pingback request
You can add custom pingback parameters via payment.customParams.
In Project > Settings area, Custom Pingback Parameters is where you can add custom parameters that you would like to receive from a Pingback request.
Parameters with OWN value are always the ones that you have passed to us as custom parameters and want us to communicate back to you via pingback. In this way, you can manage your custom data based on processed transactions.
For example, in the setting, you add a new my_custom_param parameter with a value of OWN

Then, in the SDK, you initiate the payment with customParams as follows:
let payment = PaymentObject(
    itemID: "7f433654-9d34-41ef-b94f-8da635f510eb",
    userID: "7ed7105b-6bf0-49c6-871f-b66d11690126",
    name: "Test Payment",
    price: 10,
    currency: "USD",
    countryCode: "US",
    email: "user@example.com",
    customParams: [
	    "my_custom_param": "test"
    ]
)
When a transaction completes, the pingback will be sent to your server as follows:
http://www.yourserver.com/anypath?goodsid=gold_membership&is_test=1&**my_custom_param=test**&ref=b1493096790&sign_version=2&slength=1&speriod=month&type=0&uid=pwuser&sig=ac785c67092b858c5de5b7981e81a7db
For more details, please check the Paymentwall documentation.
6 - Setup Deeplink
For certain payment methods, users must complete authorization in an external browser/app. To redirect them back to your app afterward, you can either configure the URL schemes or universal link
6.1 - Configure URL Schemes
We’ll begin with URL Schemes. They’re simple to set up — you just need to define the scheme your app will use. To do this, open Xcode, go to your project’s Settings → Info, and add a new URL scheme under the URL Types section.
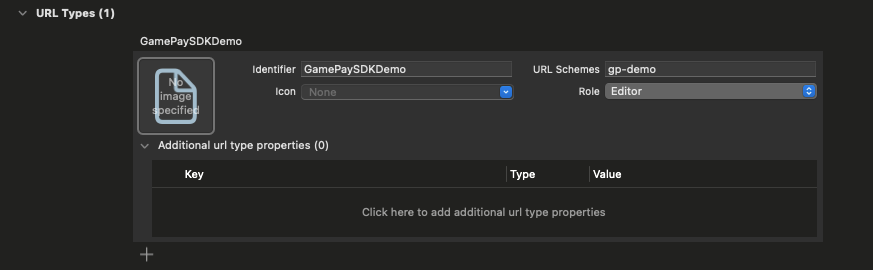
Make sure to replace sample scheme (gp-demo) with your own app scheme
Now you can test it by tapping the link gp-demo://test from Notes app, we can see the system detects the link and shows a pop up to ask for permission to open your app
6.2 - Configure Universal Link
Universal links are a bit more complex. Basically, we want IOS to relate a webpage URL to our app. To set up a universal link:
- Host an
apple-app-site-associationfile on your domain. - Add the Associated Domains entitlement to your app configuration.
Add an apple-app-site-association file to your domain.
Place a file named apple-app-site-association in the .well-known directory of your domain to specify which URLs your app can handle. In this file, include your App ID, prefixed by your Team ID, which you can locate on the Membership page of the Apple Developer Portal.
{
  "applinks": {
      "details": [
           {
             "appIDs": [ "37N222R38X.com.example.app"],
             "appID": "37N222R38X.com.example.app",
             "components": [
               {
                  "/": "/gamepay-redirect*",
                  "comment": "This matches any URL with a path that begins with /gamepay-redirect"
               }
             ]
           }
       ]
   }
}
Add the Associated Domains entitlement to your app configuration.
- Open the Signing & Capabilities tab for your app’s target in Xcode.
- Click + Capability, then choose Associated Domains.
- Add
applinks:example.comto the Associated Domains list.
For more details, refer to Apple’s Universal Links for Developers documentation.
7 - Test the Integration
7.1 - Sandbox
Brick
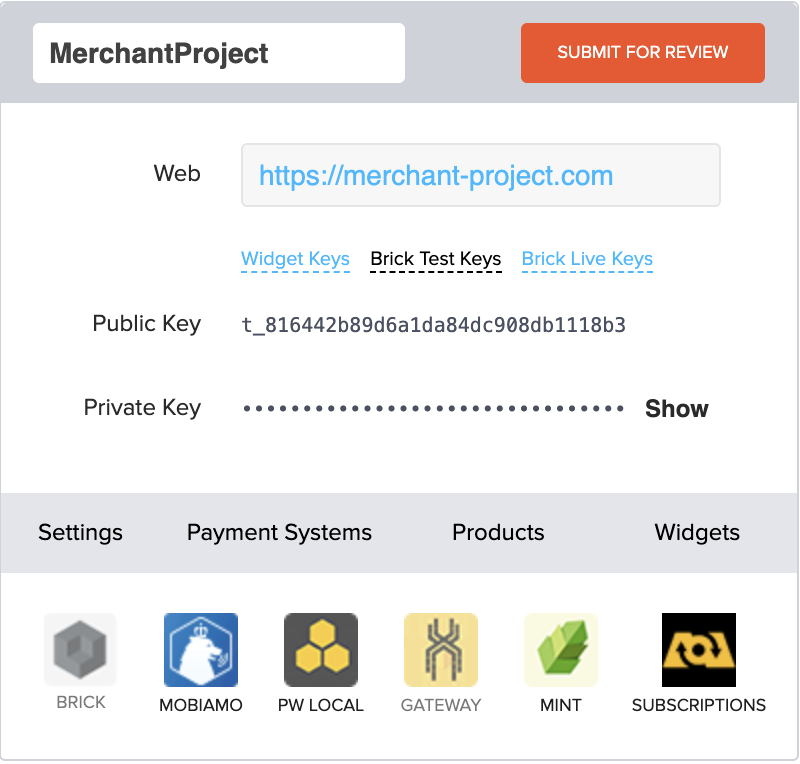
Retrieve sandbox keys for Brick in the Merchant Dashboard.
Terminal3 provides you with a standard Visa test card to test payments:
- 4242 4242 4242 4242
- 4000 0000 0000 0002
You should use a valid expiration date to test.
CVV/CSC could be set to any 3 or 4-digit number to test payments normally. Using the CVV/VSC code below will result in a different outcome while performing test payments.
| CVV/CSC | Description |
|---|---|
| 111 | Error: Please ensure the CVV/CSC number is correct. |
| 222 | Error: Please contact your credit card issuing bank to check your balance. |
| 333 | Error: Please contact your credit card issuing bank to approve your payment. |
| 555 | Review: Your payment is under risk review and will be accept automatically after 2 mins |
| 556 | Review: Your payment is under risk review and will be declined automatically after 2 mis |
PayAlto
Follow the instructions to set up the Test Payment Method.
Next Steps
- Test thoroughly with all supported payment methods
- Set up webhook endpoints to handle payment notifications
- Implement proper error handling and user feedback
- Configure your Terminal3 Dashboard with appropriate settings
- Test in the production environment before going live
For additional support and advanced features, visit the Terminal3 Developer Portal.