Terminal3 Payments SDK
Deprecated
Use GamePay SDK instead.
Introduction
- Terminal3 Payments SDK is global mobile payment solution from more than 200 countries with local payment options.
- Our Core SDK is a light version(only 2.2MB) but it will become a native part of your application. When user enter payment page, it can help you eliminates the necessity to open a web browser for payments.
- For these popular payment methods, we have do special optimization for mobile user experience and we also support all these payment methods.
- We also provided utility plugin for widget customization and credit card scanning as a extra plugin. You can easily make your payment step unique and convenient.
- Terminal3 Payments SDK could provide a better conversion rate and bring more volume for your business. Just few of code lines, your user can see local payment options your users are most familiar with.
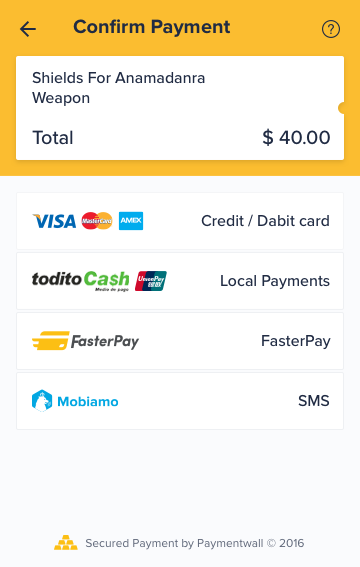
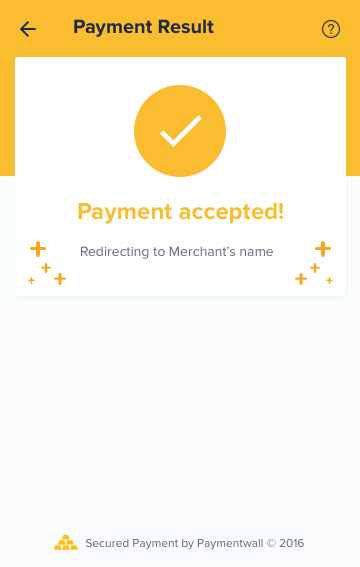
How does our SDK looks like?

How does it work?
Step 1: Download library from Github
Our mobile team has built Android and IOS libraries. You can find our integration library and code samples with following links:
Step 2: Configure Core SDK
-
After download our SDK and registered a Terminal3 Payments account, you will get your credential in My Projects page
-
You need to configure project key/public key into integration file
-
When user want to make a payment, you need to add your product information in Unified Payment Params:
See parameter definition for the requirement and meaning of each parameters while using onetime payments.
import com.paymentwall.pwunifiedsdk.core.PaymentSelectionActivity;
import com.paymentwall.pwunifiedsdk.core.UnifiedRequest;
import com.paymentwall.pwunifiedsdk.util.Key;
import com.paymentwall.pwunifiedsdk.util.ResponseCode;

request.setPwProjectKey(Constants.PW_PROJECT_KEY);
request.setPwSecretKey(Constants.PW_SECRET_KEY); //optional, if you add your secret key here, signature will generate from SDK but we highly recommend don't expose secret key to front end. You can use your server calculate it.
request.setAmount(good.getPrice());
request.setCurrency(good.getCurrency());
request.setItemName(good.getName());
request.setItemId(good.getId());
request.setUserId(Constants.USER_ID);
request.setSignVersion(3);
request.setItemResID(good.getImage());
request.setTimeout(30000);

request.addCustomParam("timeStamp", System.currentTimeMillis() / 1000 + "");
request.addCustomParam("own_order_id", "o123456");
request.addCustomParam("shopname", "ecopark");
#import <PWCoreSDK/PWCoreSDK.h>

PWCoreSDK.sharedInstance().setupPaymentwall(
  withProjectKey: "YOUR PUBLIC KEY",
  secretKey: "YOUR SECRET KEY", //optional, if you add your secret key here, signature will generate from SDK but we highly recommend don't expose secret key to front end. You can use your server calculate it.
  requestTimeout: 30,
  clearPaymentMethodsAfterFinish: false
)

let payment = PaymentObject()
payment.name = choosenItem.name
payment.price = Double(choosenItem.price)!
payment.currency = "USD"
payment.image = choosenItem.image
payment.userID = "test_user"
payment.itemID = choosenItem.name+"id"
payment.signVersion = 3

let customSetting = ["widget":"p1",
                    "ag_type":"fixed"]
payment.pwLocalParams = customSetting

PWCoreSDK.sharedInstance().setPaymentObject(payment)
Step 3: Choose Payment Methods
In this step, you need to choose what payment methods you want to show to your users and how to show them.
-
Based on your users countries, most popular local payment options can be activated from our backend. If you have any questions or concerns, please contact us.
-
Choose your integration model. Now we have three different integration models. For more details please check mobile payment methods page.
-
If you processed 100,000+ USD a month and want to have a special mobile payment methods solution, please contact us.
Step 4: Choose Utility Plugin(optional)
We are trying to provide a unique and convenient experience for all merchants.
Through our utility plugin you can easily get:
-
Customized widget
-
Scan card ability
-
Use your own payment account with our SpiderPipe product. You can receiving money under our risk filter protect and get merchant support, CRM support service for free!
For more detials please check Utility Plugin tab
Step 5: Handle pingback
On your server side, put the following code as an online server interface to interact with our Pingback:
<?php
require_once('/path/to/paymentwall-php/lib/paymentwall.php');
Paymentwall_Base::setApiType(Paymentwall_Base::API_GOODS);
Paymentwall_Base::setAppKey('YOUR_PROJECT_KEY'); // available in your Paymentwall merchant area
Paymentwall_Base::setSecretKey('YOUR_SECRET_KEY'); // available in your Paymentwall merchant area

$pingback = new Paymentwall_Pingback($_GET, $_SERVER['REMOTE_ADDR']);
if ($pingback->validate()) {
    $productId = $pingback->getProduct()->getId();
    if ($pingback->isDeliverable()) {
        // deliver the product
    } else if ($pingback->isCancelable()) {
        // withdraw the product
    } else if ($pingback->isUnderReview()) {
        // set "pending" as order status
    }
    echo 'OK'; // Paymentwall expects response to be OK, otherwise the pingback will be resent
} else {
    echo $pingback->getErrorSummary();
}
?>
var Paymentwall = require('paymentwall');
Paymentwall.Configure(
    Paymentwall.Base.API_GOODS,
    'YOUR_PROJECT_KEY',
    'YOUR_SECRET_KEY'
);

var pingback = new Paymentwall.Pingback("query data in pingback request", "ip address of pingback");
if (pingback.validate()) {
    var productId = pingback.getProduct().getId();
    if (pingback.isDeliverable()) {
        // deliver the product
    } else if (pingback.isCancelable()) {
        // withdraw the product
    }
    console.log('OK'); // Paymentwall expects the string OK in response, otherwise the pingback will be resent
} else {
    console.log(pingback.getErrorSummary());
}
import com.paymentwall.java.*;

Config.getInstance().setLocalApiType(Config.API_GOODS);
Config.getInstance().setPublicKey("YOUR_PROJECT_KEY");
Config.getInstance().setPrivateKey("YOUR_SECRET_KEY");

Pingback pingback = new Pingback(request.getParameterMap(), request.getRemoteAddr());
if (pingback.validate(true)) {
    String goods = pingback.getProductId();
    String userId = pingback.getUserId();
    if (pingback.isDeliverable()) {
        // deliver Product to user with userId
    } else if (pingback.isCancelable()) {
        // withdraw Product from user with userId
    }
    return "OK";
} else {
    return pingback.getErrorSummary();
}
require 'paymentwall' # alternatively, require_relative '/path/to/paymentwall-ruby/lib/paymentwall.rb'
Paymentwall::Base::setApiType(Paymentwall::Base::API_GOODS)
Paymentwall::Base::setAppKey('YOUR_PROJECT_KEY') # available in your Paymentwall merchant area
Paymentwall::Base::setSecretKey('YOUR_SECRET_KEY') # available in your Paymentwall merchant area

pingback = Paymentwall::Pingback.new(request_get_params, request_ip_address)
if pingback.validate()
    productId = pingback.getProduct().getId()
    if pingback.isDeliverable()
        # deliver the product
    elsif pingback.isCancelable()
        # withdraw the product
    end
    puts 'OK' # Paymentwall expects response to be OK, otherwise the pingback will be resent
else
    puts pingback.getErrorSummary()
end
from paymentwall import *
Paymentwall.set_api_type(Paymentwall.API_GOODS)
Paymentwall.set_app_key('YOUR_PROJECT_KEY') # available in your merchant area
Paymentwall.set_secret_key('YOUR_SECRET_KEY') # available in your merchant area

pingback = Pingback({x:y for x, y in request.args.iteritems()}, request.remote_addr)

if pingback.validate():
    product_id = pingback.get_product().get_id()
    if pingback.is_deliverable():
        # deliver the product
        pass
    elif pingback.is_cancelable():
        # withdraw the product
        pass

    print('OK') # Paymentwall expects response to be OK, otherwise the pingback will be resent

else:
    print(pingback.get_error_summary())
using Paymentwall;

Paymentwall_Base.setApiType(Paymentwall_Base.API_GOODS);
Paymentwall_Base.setAppKey("YOUR_PROJECT_KEY"); // available in your Paymentwall merchant area
Paymentwall_Base.setSecretKey("YOUR_SECRET_KEY"); // available in your Paymentwall merchant area


NameValueCollection parameters = Request.QueryString;
Paymentwall_Pingback pingback = new Paymentwall_Pingback(parameters, HttpContext.Current.Request.ServerVariables["REMOTE_ADDR"]);
if (pingback.validate())
{
    string productId = pingback.getProduct().getId();
    if (pingback.isDeliverable())
    {
        //deliver the product
    }
    else if (pingback.isCancelable())
    {
        //withdraw the product
    }
    Response.Write("OK"); // Paymentwall expects response to be OK, otherwise the pingback will be resent
}
else {
    Response.Write(pingback.getErrorSummary());
}
A pingback request typically contains all the information for you to do the product delivery. As an addition, Terminal3 Payments provides a series of reversed parameters as custom pingback parameters for specific needs, you can also add your own parameters as custom pingback parameter in order to implement parameter transmission.
Below is a sample with default format:
http://www.yourserver.com/pingback_path?uid=pwuser&goodsid=gold_membership&slength=&speriod=&type=0&ref=b1493096790&sign_version=2&sig=d94b23ba8585f29978706dd1b153ead9
After validating the pingback, your server is always expected to be able to proceed the delivery process and respond to it with only OK in the body of response.
Next Step
Once you have successfully integrated our widget and set up for the pingback listener, you can submit your project for review.
See project go live.